Sunday, February 20, 2011

Winter 2011 - Brushstrokes

Watercolor Class Winter 2011

Torrance class – The instructions for the poppy are the same the only thing I did different was instead of negative painting with random colors, I used colors that would make the flower appear as if against the plant. Color doesn't matter but where you want to go with it does. Have fun.

PV class – I am going to write up the different strokes we covered in class for the blog I am also going to create a page so you don't have to go through all the archives if you need to review (I tried to find the last time I did this demo and couldn't so I know you would have problems). I repainted the strokes so I could photograph them easier but they are still the same. Hope this will come in handy, the link is on the side bar.

Also Note: Blogger does not make it easy for me to insert pictures, this has taken me days and I still didn't have much success with all the images I had to post. If you want to se examples of the strokes just click on the slide show in the side bar and it will take you to the picture page. Sorry this has taken so long but I keep hitting deand ends.

Some basics before we get into techniques: A brush is NOT a pen or a pencil, you hold it in your hand so you can get the job done sometimes that means being able to roll it in your fingers or scrub away. We also use all surfaces of the brush not just the tip or end of the brush, this goes for all brushes whether they are flat or round. It is also good practice to hole the brush back at least mid way and better yet to hold it at the end not up by the metal ferrule, this will give you brush more action and your painting won't look as tight. Save that for the final details.

Also, keep your brush relatively dry. If you rinse it, wipe it out with a paper towel to get rid of any excess water which can flow down off your brush and thin your paint so that it won't cover the way you thought it would.

Brush strokes matter. They can tell your viewer a lot about the texture or the terrain even the direction or the shape of something, think about what you are painting and what you can do to make it look more authentic.

Dry Brush –Key things to remember are: Dry Brush means DRY BRUSH! If you rinse your brush be sure you have dried the brush so there is no water visible when you squeeze the bristles, water will hide up near the metal ferrule so be sure to dry the whole bristle area. It also means that there is little paint on those dry bristles so after you load your brush be sure that there are no globs of paint on the ends or sides, wipe it on a paper towel if you have to, to avoid having too much paint or water.

The other thing to keep in mind is pressure. If you press down hard on your brush, more paint will come off and fill in the area, the lighter you press down, the brush will only hit the high spots on the paper leaving little "holes" so you can see the under painting or the paper showing through.

Depending on what you are painting at the time dry brush can be used to add in some color such as mist or dust or when you are making waterfalls or the glimmer on the ocean or palm fronds.

Stippling – This is a good stroke when you are leafing out trees or creating bushes or distant flowers or even adding some texture, the pressure rule applies here as well but you can have more paint on your brush.

I usually use a flat brush for this technique but a round one will work. When I pick up paint I take my brush, on my palette I tap the end of my brush straight down on the mixing area, not so much to mix the paint if I have more than one color but more to "fuzz up" the end of the brush so it spreads out and looks all twisted, this is great for trees and bushes because it creates a random look to the area. I apply the paint by touching the end of the brush straight on to create the tree or bush or texture I need. Remember that the amount of pressure you use on your brush will determine how much paint comes off your brush. If the area is too congested with paint, you are too heavy handed. I have literally had the brush fall out of my hand because I was holding it so lightly when doing this technique.

The Liner Brush – This little brush makes great trees, branches, weeds, grass, fence wire, boat rigging…Any where you need a nice thin line the liner is the brush to use. It does take practice to master and mixing the right consistency of your paint is half the battle. The paint needs to be very ink-like. If you tip your palette it should run. Next you need to load it fully, really work the paint into your brush and as you lift it off your palette, roll it in your fingers.

Hold this brush as far back on the handle as you can and hold the tip slightly down so the paint will flow. If you are doing trees or branches, the harder you press the thicker the line, lift as you come up to get a thinner line and wiggle your brush a little to give the tree/branch/weed some character.

When doing grass, get your hand and brush moving in a circular motion before you get to the canvas, when you get the rhythm, touch the canvas on the upstroke. Big circles = tall grass, little circles – short grass.

Flat or Round Sable brush - You can create leaf shapes by loading your brush with a good amount of paint but it should be worked into the bristles then start by touching the edge (flat brush) or the end (round brush) then as you move the brush press and twist then twist and lift to finish. You can create all shapes of leaves and grasses using this stroke but it does take some practice.

Wet into Wet – The area to be painted is first painted with water to make the paper wet, when you add paint to this area the paint will spread on its own and will create soft edges and blends with other colors.

Wet on Dry – the paper is dry so when you apply the paint you will get hard edges.

Using a flat or an angle brush if you load the paint on the tip or a corner and work it into the brush you can get a nice graded stroke.

With a round brush to get a graded color working wet on dry, apply the color, rinse your brush and dry it and with a damp brush run it along the edge you want to soften.

These are just a few of the ways you can use your brushes and the watercolor but it isn't by any stretch of the imagination the complete list. Watercolor is a very versatile medium it is up to you as the artist to find the ways it works best for you.

PV class, We will be working on the apple please download and print so you have it in class.

Saturday, February 12, 2011

Watercolor Class Winter 2011

WATERCOLOR CLASS – Week 5

Torrance class, we finished up the snow picture so please be ready to do the poppy on Monday. Download and print the reference picture NOT my painting of it, for reference.


PVAC class – We started a water picture using a photo I took along the PV cliffs near Lanada Bay. The water was clear and calm so you could see to the bottom close to shore. Each situation – calm or choppy, few waves or big crashers – poses it's own set of problems but the first one may seem like a no-brainer but you would be surprised at how easy it is to do (I saw it in class even after I explained it) and that is to have a horizontal horizon line. That means that it needs to be parallel to the top and the bottom of the paper. Use a ruler if you have to but please, make the horizon line straight when there is water involved. This holds true for oceans, lakes, ponds, fish tanks or glasses of wine, anytime you have a liquid involved it is going to be level otherwise it will look like it is spilling and we don't want that especially when large bodies of water are concerned.


Since this was a demo on water, I will focus on the water aspect more so than the rest of the painting but will do some brief descriptions of what I did in those areas.


The first thing I did was to mask out any areas that I need to be white at the end, it has to dry completely before you can put wet next to it but you can do the sky. The sky area was first painted in just clear water, this will help the paint to move on its own. Next I picked up a little blue and a touch of sienna (if you have cerulean blue that is a good sky color on its own) and water to make a light gray/blue on my palette then I just touched this color along the top part of the sky and a few places lower and let the wet paper and paint work their magic. This will work better if you work at a slight angle so gravity can help out, if you are working flat, you may have to coax the paint along thru this whole process. The water will be painted exactly like this – wet into wet – so the elevation of your paper will only help you.


You might want to let the sky dry before you start on the water so you don't get any "blooms" into your sky though they could look like clouds later on.


Starting at the horizon, I wet the water area with clean water, again to help the paint move on my paper. With that same gray/blue color I just used in the sky, I touched my brush along the horizon. I want to keep my strokes horizontal just touching the paper as I go back and forth. As I come forward, I pick up more blue but I need to keep it light so add water if you need to. Just past the point of the bluff I finished wetting the paper then started adding touches of Hooker's green into my blue mix, touching this color along the base of the bluffs and along the sides of the paper leaving that sandy area getting greener as I came closer to shore. In the sandy area I picked up sienna and water and added it into a corner of the green color on my palette, just enough of the green to slightly gray the color. I touched this warm color to the wet paper and let the tow colors blend together on the paper by themselves. If your paper has dried, you may need to re-wet before you do this, or use some water on your brush and touch the areas between the green water and the sand. Do not worry about the blooms if they happen, they add texture to the under painting.


Please keep this step very light. These are just tints, if you get too dark too soon it could be hard to get the highlights you will need later.


While the water is drying, if you want to paint the cliffs and the shore sand, now is a good time. On the cliffs I used sienna with touches of orange for the dirt areas, please note that the dirt is sliding down at different angles so make your strokes follow the angles. Leave spaces for the trees and bushes which I painted in first with a mix of sap green and yellow very lightly and detailed them darker later.


The sand on the shore is a mix of yellow, a tiny touch of purple to gray the color (purple is the compliment to yellow) and a lot of water, this too is just a tint.


When the water is dry, again starting at the horizon with the flat edge of my angle brush (a flat brush or round will work, practice with it first) and using a slightly darker version of the gray/blue (blue with a touch sienna and water), I touch the end of my brush to the dry paper keeping my brush parallel to the top and bottom of the paper, this will keep my strokes horizontal. As I touch the paper, I will leave some areas the show the under painting, this is good, it acts like sparkles on the water.


Just like I did in the first step, I add blue as I come forward, still using the same technique of touching though I was tilting it a bit so I could use more of the side of the brush switching to the Hooker's green in the foreground. Also, my strokes got further apart as I came forward as well as longer – think wave swells.


Rule of thumb for distance: Things that are closer to you are larger, further apart, more detailed and more intense in color, as things go off into the distance they become smaller, closer together, less detailed and softer and grayer in color. This works for everything.


There is some reflection and shadows in the water, I do want you to notice that the reflection has a broken edge caused by the action of the waves so when you paint these colors onto your paper, paint them just the same way as you have been painting the swells with the blues and greens just use a darker green/blue and sienna with a touch of blue where the dirt reflects.


I should state at this point that if you want more intense colors and darker values, you will need to repeat this step several times. I only did this once through so you can get an idea of how to paint water because of time constraints. If I was to do this for myself – and I might finish this at home – I would definitely intensify the values and the colors. That doesn't mean that I would cover up everything I did, it would mean that I would add more color and more detail especially to the foreground, leaving some of the existing color to indicate waves of different sizes and shapes, it could take a couple more hours to finish this the way I feel it should be finished.


Along the shore where I have my masking fluid saving the foam, I want to be sure that I get some darker color around the masked off areas whether you are using the blue or the green, be sure that you get that color in so your waves will show up when we take the mask off. There are also some rocks along the shore that will help define the foam along the shore, the rocks are a mix of sienna and blue to make a dark color and when you add the rocks to the point of the bluff they should be lighter (see Rule of Thumb above), smaller less detailed than the ones near the foreground. This same color with a bit more blue and water can be used for the dark shapes in the water just remember to rinse your brush and use the damp brush to soften the edges of these shapes. When the paper is totally dry you can remove the masking.


The cliffs and trees can be finished by adding more washes of color, remember that the light colors are your highlights so don't paint them all out. You can add shadows, intensify the color, how ever you want to finish it. Enjoy the process, don't be in such a hurry to get a painting done as you gain experience you will also gain speed but really it is the journey you take when painting that should be the most enjoyable aspect, the rest is frosting.


The next class I will be going over brush strokes so there is no photo to down load just have some paper to work on.

Saturday, February 5, 2011

Winter 2011 Watercolor class

WATERCOLOR – Week 4


Torrance students: The instructions for this week's class are pretty much the same as for the PV class a couple of weeks ago so check the archives for that lesson. The only thing I did that was different, I added more masking to protect the foreground trees and some of the branches before adding the middle ground trees and another wash on the snow.


PV – Poppy


To save time, I had already drawn the sketch of my poppy on my paper before class, that said, it really doesn't make a difference if you have your design on before or do it after this first step, so if you don't have your design on, you can wait until the paper is dry then add the design.


I do want to point out a vital issue when you are organizing your design, that is you main subject should be important on the page. If you are working from a photo – either your own or out of a magazine – you are not bound by what you see in that photo. Your priority is your paper. Make the subject big enough to show its importance. This is especially true when you only have one subject, fill the paper with the subject. My poppy takes up almost 3/4th of the paper because I what everyone to know it is important. I kept most of it out of the middle, just off center and I even have part of it going off the page. When you do take part of something off the page be sure that it looks like you intended to do it, don't take the tips of your petal, for instance, to the edge of your paper because if you mat it, it will visually look like it is stuck on the mat, so if it is going off the paper, make it definite.


To start this first step – and this is what a lot of you missed – I wet the paper first, first by spraying it with my spray bottle then with my big brush to get it well coated with water. Next, using my 1" angle brush i.e. the biggest brush you have, I picked up color on my palette that had enough water in it so it was drippy and splattered color on my paper. I used most of my colors except my browns and while it was wet I tilted my paper, threw on some salt and added some plastic wrap before I was all through.


A word of caution: Throwing paint can start to feel too good and you can very quickly go from interesting to mud in a blink of an eye so it is better to stop sooner rather than later and let it dry, you can always add more if you want later. Let it dry completely before starting the next step especially if you added plastic it will take longer for the paper to dry under the plastic.


The first area I painted was the center of the poppy. I used yellow and made a ragged top edge to suggest the fuzzy form of the center, along the bottom of that yellow I added touches of orange and sienna for shadow.


Now the color for the background is not important, I could have – and have in other things I have painted – used black ink for the entire background but for this demo I picked up my red, blue, purple and hooker's green to paint in the area behind the flower and leaves, this is called "negative painting" and it is something that as a watercolorist you will use quite often. Basically, I started with my most concentrated color – more pigment, less water – in the lowest part of the spaces between the petals keeping the color more vivid until I got past the end of the petal then I rinsed my brush and with clear water along the outside edge of that color while it was still wet, I bled it into the background. You may have to rinse your brush often to get it to fade out, just be sure you do not have excess color on your brush before you start this process. When I changed colors, I would blend the new color into the old so there was hardly a noticeable transition from one color to the next. I continued this process until I had all of the flower and the leaves outlined with the color.


Have your reference photo at the ready so you can see where the shadows are on the flower. The color I used for the shadows on my flower will always be blue with a touch of purple, no sienna this time, but lots of water. You want a thin wash for most of the shadows and by letting the area dry before you go over parts with the next wash, the wash doesn't even need to be darker because with water as you add layers, you also add density. Remember to take a damp brush and soften the edges of the color as you put it down.


In the center next to the yellow, you may need to mix a darker value of the blue and purple (less water) to get a dark enough color to carve out the fuzzy top, this is again negative painting because you are painting around the thing, not the thing its self.


The leaves were under painted with yellow then with sap and hooker's green depending on whether the area was light or darker, I negative painted in the veins of the leaves.


While I was doing my demo, people were asking whether I ever used white or pen and ink – yes to both. While I try not to make a habit of using white because it can make a color look chalky, I do occasionally need to use it, this was a good case in point. The splattered soft background tinted all of my paper so I didn't have any white and the edges of my flower looked a bit dingy so I borrowed some white and brightened a few of my lightest areas.


To finish my painting off, I took a permanent, fine tipped marker and added lines and detail around the edges of my flower, leaves and center. Remember, this is art, there are no hard and fast rules. If you want to use white or black, ink washes, collage or what ever strikes your fancy, feel free to do so, that is the only way you are going to know what it is you enjoy about art.


Next week I will be doing a water demo, maybe some rocks or…I'll find something to help you on your journey. See you soon.

Friday, January 28, 2011

Winter 2011 Watercolor Class

WATERCOLOR Week 3 - Snow Demo


Torrance students please go back to the blog from a couple of weeks ago for the instructions. I will post a picture of the one I am doing in your class but all the techniques are basically the same. If I think of anything I didn't cover in class, I will mention it, right now you need to get your drawing finished, get your masking fluid on, get the sky and the distant trees in along the horizon.


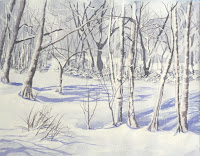
This was the final week for our snow/white painting, the main point to this exercise is no matter what the subject is if it is white you need to have dark to show it off. It doesn't matter whether it is snow, lace, fur or whatever, if you want it to have depth and texture you need to have the contrast in values to show the white off. You can see this in the everyday things around you and in the works of other artists, the more you look for these things the more you will understand them.


I know that some of you were worried about leaving the masking fluid on for more than a couple days and took it off, that's okay but I have found that I can leave it on for a couple weeks with no problem. Part of that is the paper the other is how you store your painting between working on it. If the paper has a soft surface (you may want to test on a scrape piece of the paper you are working on), the masking can be absorbed from the start and even if you took it off within minutes of it drying, it will tear the paper. I've only had that happen a couple of times, just test your paper to be sure, each manufacture does things a bit different from the next.


The other way you might have problems with the masking tearing you paper is if it has been around heat. If you use a hair dryer it must be one with a cool setting and hold it back from the paper at least a foot. The other source of heat could be your car or if it is in a room that gets heated by the sun coming thru the windows like a back porch (my problem). If you are stopping on the way home and have your painting in the car, don't throw it in the trunk if you can, put it on the floor – front or back – and place a blanket or coat over it. This will insulate it for a while but best not to make an afternoon of your stop, get it home and into a cool, dry area.


Using your liner brush for those mid-ground trees make sure that not only do you have big dark ones but also lighter ones, smaller ones, some in front, some in back. That patch of trees may be 20 or more feet across so not all of the trees will be right along the front some will be in the middle or back and you suggest that by where you start you trunks. If you start them in front of the bushes in mid-ground plus if they are darker, they will look closer. If you start them in the middle of that color for the undergrowth, they will look like they are in the middle. If you make them lighter and start at the top of that undergrowth color, they will look like they are at the back. Also, don't be afraid to overlap or make groups of 3 or more. The one thing you do need to watch out for is lining them up in a nice, neat row, this isn't an orchard it is a woodland grove, nothing neat about it.


Once you have those mid-ground trees and branches in, it is time to move up to the foreground trees and their branches. Still using your liner brush mix a dark color (blue, sienna, touch of purple) and really congest the branches in the foreground. If you look at the sky area in particular, you will see tons of little branches and twigs, also note that there is a tree off the paper that has branches coming in from off the page. This will give you a lot of practice with your liner brush, remember if you want a thicker branch you press down on your brush and thinner ones you lift your brush. Another thing to keep in mind is that the branches will start on all sides of the tree, don't just have them coming off the side, start some in front and don't be afraid to overlap, it's what Nature does.


At this point we need to get some of the shadows behind the mounds of snow at the bottom of our trees otherwise they won't show up. I mixed my blue and purple – mostly blue – and a lot of water to make a light wash then painted in on behind the drifts around the bases of the trees. Once I put it down, I rinsed my brush and ran a damp brush along the edge of the color to soften the edges. I also used this light wash in other areas around the base of the trees to suggest texture but each time I softened the color around the edges. To make the cast shadows from the trees, I added a bit more blue and purple to that color and when I applied it I kept in mind that the shadows will follow the terrain, the snow is not flat and your shadows need to follow the snow. Again, once I had placed my shadows, I rinsed my brush, dried it a bit then took the damp brush and ran in on the edges of the shadow to soften them.


Now I removed the masking fluid from my trees. Make sure that the paper is completely dry before you take it off or you could tear you paper. use a damp brush to soften the edges where you had masking.


The detail in the trees was done using my ¼" angle brush and adding a touch of sienna to the blue and purple, created a dark color. The key thing to remember here is that the trunks are rounded so any stroke you pull across the trunk needs to be a "u" shape, other than that all the marks on the trunks are just shapes – dashes and dots as I heard one artist call them – nothing that takes any serious thought, just simple, quick marks with your brush.


At this point you need to finish it how you see fit. There were some grasses in the front that are done with the liner, notice that I did them in a gray/brown color not green. Why? Because there is no green anywhere else in my picture and I don't what to have what is called a "unique color", it would be distracting. If you need more shadows in places to make the trunks stand out, that is fine, just remember that a little color can go a long way so don't start out dark just use light washes, you can add more to build up the dark if you need to just let it dry before between washes so you can see how it will look.


Next week I will be doing another "white" demo using the poppy I posted on the picture page. If you want to follow along please print the picture out at home and have it for class, you can have it drawn on your paper before class if you want to save time. See you soon.

Friday, January 21, 2011

Winter 2011 Watercolor Classes

Watercolor Week 2 – Snow Demo

(Click on the Slide Show in the side bar to go to picture page)


In this weeks class we started the snow project. If you are using your own show picture you will have to adjust what I do in my demo to your subject but the basics of painting snow are all the same, we all need to start out with a reasonable drawing on our paper. While you don't need to draw every stick in the pictures, you do need to have a good enough drawing to know where you are going with it and also so you know where you will need to put your masking fluid. When you are painting something that will have a lot of white or tiny detail it is always a good idea to have masking fluid handy.

When you are drawing your guide lines onto your paper remember, you are not obligated to draw it exactly as you see it. More often than not, when you are working from a photo or even in real life (plein aire), things aren't always either in the best position of are the right size of there is something that just doesn't help your composition, as an artist you are the ultimate PhotoShop! You can move mountains if you have to in order to make a more pleasing painting. The photos I am working from are good examples, the photographer had to take the picture before the snow melted or got all messed up even though the lighting wasn't the best and it may have been hard to get into the best position to take the picture because of the snow but she took the photo and now as artists we can move things into positions where they will work for us and not against us. We can assign importance to things or move them to a supporting role, we, as artists, have a lot of power over that piece of paper.


Aside from alight source which is virtually non-existent in the photos, the main trees are rather small and in a fairly straight line which is visually rather stagnant. When I drew my trees, I mad them a bit lager then they were in the photo and put them on a slight angle, this gives them more importance in the picture and it gives the whole painting a much better eye flow we want to keep our viewers in our paintings so we need to make them interesting.


I also had to make a decision on where the sun is coming from so I choose the upper right side a bit behind the trees. This way I will know where my shadows and highlights will be.

The yellow you see is the masking fluid.


Once I had my drawing the way I liked it, I got out my masking fluid and painted a few areas where I think the sun will be the brightest, I need to mask them so I don't have to worry about painting around them because I will forget. I put the masking on the sunny side of the trees and the snow around their bases and also in where the bushes and brambles of the undergrowth are in the middle ground trees. The masking has to dry before you can proceed. A word of caution: You can use a hair dryer on the masking fluid ONLY IF is has a NO HEAT setting. If you use heat you run the risk of melting it into your paper, then you are in a world of hurt when you go to peel it off.


Another thing I will mention is I am using a very limited palette. What that means is I am only using a few colors, they are: Orange, burnt sienna, ultra marine blue and dioxizine purple. I may also use a bit of a red but I haven't gotten to that point yet. Mostly, for the gray colors it will be a mix of blue and sienna with the occasional touch of purple and water to thin it down. That's it. I may vary it from warm to cool by adding more sienna or blue or purple but I won't be using any other colors for this entire painting.


I started in the sky area, you may want to paint with just water to wet the area first so your paint will spread easily, on my palette I mixed blue with a little touch of sienna and lots of water to create a blue/gray color and painted it into the sky, it should be pretty light. Paint the sky all the way across the page don't worry about painting over the trees they aren't white anyway so will eventually get painted.


While the sky is still a little damp (the shine should be off the paper), into that same color on your palette, add a little more blue and sienna to slightly darken the color and right along the horizon into the wet area, make some tree shapes to suggest the very distant trees. The color may start to "bloom" into the wet sky but that is okay, it is why I said to add it to the damp sky so the shapes will soften and look more distant. Let this dry.


Watercolor can be a waiting game and you can't rush it too much. Yes you can use a hair dryer, just remember to use the cool setting because of the masking fluid but if you paint near a wet area you can get blooms where you really don't want them.


Next, in that same color you've been working in, add more blue and sienna, you want a darker gray for the middle ground trees though this is really for all the small branches and leaves and things at the tops of the trees also for the undergrowth. This time you will need to paint around the foreground trees using negative painting. If you get color where you don't want it, rinse your brush and dry it slightly and "lift" out the color. I had to do that several times myself. Just paint shapes that look like the tops of the trees. This color should be a couple shades darker than the distant trees so it stands out from the background.


You can also use this color to suggest some of the shadows and the terrain the key here is to work wet on dry by putting the color down, then rinsing your brush and with just water go on either side of the color you just put down and soften the edges. Places where this is important is where the middle trees end, there is a slight depression between the background hill and the foreground area, also around the foreground trees.


For the foreground trees I just added water to my gray on the palette so it was very pale and just painted the entire tree and branches. This is where I left off. We may get finished next week, I will have to see how the class is going. Start looking for something you would like to paint, I will do demos that I hope will help you with your own projects.


See you in class.

Friday, January 14, 2011

Winter 2011 Week 1

Watercolor Snow Demo

This project is really an exercise in how to paint white. It won't make any difference whether it is snow, a white cat, a table cloth, a wedding dress or any other thing that is basically white, everything we will be painting for the snow is applicable to any other white subject you might paint so even if you really aren't interested in snow – and with it being so cold lately I don't blame you – these demos and projects are designed to give you information and practice painting a variety of things so that when you go to paint your "masterpiece" you will have the knowledge and the skill to accomplish your goal.


A basic mistake that a lot of beginners make, is not understanding that white isn't necessarily white. A blank piece of watercolor paper could be titled "Polar Bear in a Snow Storm" because that is about as much success as you will have if you don't understand how to paint to suggest white. A key thing to remember in all your paintings is: You must have dark to show light. This is part of the value system and values are the lightness or the darkness of a color.


Some colors like yellow will never get very dark on a scale of 1 – 10, 1 being the lightest; yellow might get to a 4 if the color is straight out of the tube. On-the-other-hand, blue can get all the way to a 10 depending how much water you have put into it and the hue or color of blue. I will show how to do a value scale next week so you can see what I'm talking about. Again, not the most exciting thing in the world but value is so important for you as beginners to understand and for any one who is trying to be a better artist. Value lets you create depth in your painting, it can also creates excitement in your so it shouldn't be overlooked.


The first thing I did was sketch on a simple tree trunk with some snow piled around it. In watercolor you need to have a good idea of where you are going with your painting so having a sketch at least is a good thing, the more detailed your painting is going to be the more detailed your sketch should be, this is different from other media because it can be difficult to change a color once you have it down in watercolor. I use at least a #2B pencil to do my sketching because it is soft enough that I can get a dark enough line to see on my paper without pressing too hard which could damage the paper plus it will erase without too much pressure for the same reason. I also decided where my sun was coming from, this is important so we know where our lightest colors will be and where our shadows will fall. I chose from the above right side.


The first painting I need to do is create a dark background. Remember, you need to have dark to show light. I used my ¾" angle brush and a mix of ultramarine blue, a touch of burnt sienna, and purple to create a blue/gray color and I painted on either side of the tree. If you are working on a flatter angle than I have to paint, you can wet the area with water first to help the paint move that is perfectly fine. There are times I don't wet an area first because I have gravity working against me in class and may forget to mention that you can/should wet the area. My bad.

While the paint was still wet, I showed how to lift out some distant trees using the edge of my brush. I rinsed it out and dried it then made tree shapes in the wet paint, cleaning and wiping my brush often. It you get mutant trees that look like they have exploded it is most likely that you had too much water in your brush that flowed out at an inopportune time creating a "bloom", make sure you squeeze the bristles near the metal ferrule where water likes to hide.


Next I painted the tree trunk. I switched to my ½" angled brush and starting on the sunlit side with orange and using the edge of my brush in a vertical position, I made short, choppy strokes to start my tree. When I got about a quarter of the way around I picked up some sienna on the brush (no need to rinse), same stroke to continue around to about the ¾ mark, then pick up some purple and sienna to finish the trunk. If you have white paper showing through, don't worry about it, it will look like show that is sticking to the trunk.

Next we need to start on the snow. For new students and a reminder for returning students, in watercolor we work from light to dark. That means we use the paper white and using a series of layers or washes, we create darker values. This is important so that you don't get too dark too fast. We make lighter colors by adding more water than paint, darker colors by using less water. This first wash will be blue with a little sienna in it to gray the color and LOTS of water. This should be less than a shade darker than the paper.

Because this is just a made up picture we don't have a reference photo to work from but it is good practice for you to be able to imagine how light travels because not all photos have a good light source, the ones we will be using for instance were taken on an overcast day so we are free to choose the direction of the light. I chose for this demo, to have the light come from the upper right which means that things on the right will be light and the shadows will be on the left of things. That said, the top of the pile of snow will be white so I started painting my first wash a bit down from the top and I tried to imaging what was going on under the snow such as tree roots and rocks. There will be depressions between the roots where it will be in shadow, the opposite side of the tree the snow will be in shadow, you can suggest rocks with a simple shadow, use your imagination to see these things and paint accordingly.


When you have put this color down, rinse your brush and slightly dry it then run the brush along the edges of the color you just put down to soften the edge. Snow will not have a hard edge and this will keep it soft.


This paint doesn't need to be totally dry to add the next wash, but if you fee more comfortable working wet on dry, that is okay, just remember to soften the edges. You can add a bit more of the same colors to what you were using to slightly intensify the color, this time when you add the wash, you will start inside the first wash and you won't go out to its edge either. You can add as many washes as you want but each time you leave a bit of the previous wash to give a gradual change to create a sense of roundness to the snow.


There are some cast shadows we need to deal with the first is the shadow that is cast on the tree from the snow itself. Anytime an object blocks the light source, it creates a cast shadow. Right behind the snow there will be a dark shadow, this is a mix of blue and purple with maybe a touch of sienna, it goes down the length of the trunk where the snow is touching it. After you have added this color, rinse your brush and on the edge of this color on the tree side, soften the edge.

You can use this same color for the cast shadow from the tree on the snow, the important thing to remember here is a shadow follows the terrain it is falling on. There is snow piled up around the bottom of the tree and this shadow will follow the lumps and dips in the snow.


This was something I had to do that you may have to do as well: If you didn't get your background dark enough you may need to add another wash or two to darken it enough so your snow will stand out. Use a similar color and just wash over the area again, you may need to redo the lifted trees, but it is good practice.

The other thing I would like you to practice is using your liner brush. This little brush makes really great trees and branches but it does take a bit of practice in getting it loaded with paint and getting the feel of it.


When you load the brush you will need to use enough water so that the paint is no thicker than ink, it needs to be able to flow off the brush. Roll it around in the paint to get it well loaded then as you lift it off your palette, twist it in your fingers to form a nice point. Hold the brush at the far end from the bristles and slightly down. To create a heavier line you press down on the brush, to create a thinner line you lift up and barely touch the surface. Don't worry if your hand shakes a bit for trees this is a good thing.


If you are trying to make grasses, load and hold your brush same as above but this time rotate your hand at the wrist in a circular motion then touch the paper on the up stroke. Big circles make tall grass, small circles make short grass. Like I said, this will take practice.


We will start on the project at our next class, please be sure to have a reference photo with you it can be the one I will be working form or it can be one of your own photos. It doesn't need to be snow if you don't want but please try to fins something white. Also, we will need masking fluid for this painting be sure to get the kind without color in it. See you soon.

Sunday, January 9, 2011

Winter 2011

Hi Everyone

If you have been in my classes before you may be checking this blog so I thought I'd post the link to the pictures I will be using in class for the demo. I had a request to do snow and snow isn't just white so this should be a good learning project.

http://picasaweb.google.com/artistlgp/Winter2011#

If you don't want to paint the picts I have posted or have a different snow photo you want to work from, please feel free to do so. Everything I will cover in my demo about snow can be applied to any snow or white you have in your own painting.

Also - I can't ever remember saying this before - both my classes are pretty full, 13 at Torrance and 16 at PV so you might want to come early to get a good seat. I was amazed that my classes did so well, I want to thank everyone for signing up and for your support, you are awesome!


See you soon.