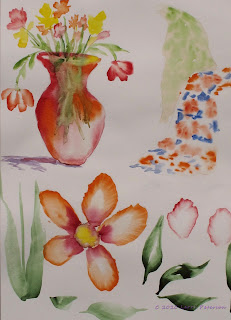
Just wanted to post the final image for the Monday class and to show how having some mats cut to different sizes (don't throw away old ones, keep them for this) and when you think you are done or if you are wondering it you painting is even worth saving, throw a mat on it and see how it looks, you will be surprised.
In our Wednesday class we worked on a couple of techniques that will give you a better sense of how your paint and brushes work. First we practiced using the wet into wet technique.
Wet into wet means that you are adding almost dripping paint onto paper that is also wet.
You need to be sure that your paints are ready to go by first spraying them so they are wet on the palette and you can get pigment when you need it. If they are dry, by the time you get enough paint on your brush, your paper will be dry so spray your paints first before you set up and they should be ready to go when you start.
If you wet the area of the paper you want to add paint, the paint will only go where the paper is wet. This can be done over large areas like skies or in this case, I only wet the area of the vase, then dropped the paint where I wanted it and let the watercolor do its thing. Have your paper slightly elevated so gravity can get in on the fun as well. Watch what the paint does, tilt your paper if you want but let the watercolor do most of the work.
Next we practiced using the angle or flat brush, this will work with either, to make flowers.
This is done on dry paper.
Loading your brush is important: It should be damp but not real wet like the above. Load the paint by only touching the tip or a corner into the paint, no more that a third of the way across the bristles, the opposite end should not have any paint at all.
Put the end with the paint where you want to start your color but PUT THE WHOLE EDGE OF THE BRUSH ON THE PAPER and at a slight angle, not straight up. as you pull the brush across the dry paper, you can wiggle it to get a jagged edge. If you have loaded your brush correctly, you should see a graded (dark to light) brush stroke on your paper,if it is too solid or even a color you either have too much water on your brush or you got too much paint on the end of your brush. Rinse and reload to keep the paint from moving across the brush. This takes practice but does some amazing things.
The leaves were started the same way by only loading the tip of the brush with paint but this time you start on the edge of the brush, start to pull then in one motion: twist, press, pull, twist and lift. You twist the brush by turning it with your fingers back and forth, the longer you pull before twisting back and lifting, the longer your leaf will be. Again practice these techniques.
Finally, you can put them all together to create something quick and fun to do. If you have cards you can paint on the cards or divide your paper into sections that you can cut and paste onto a card for a special gift to send to a friend. You get the practice and they get a special card.
Keep painting and I will see you in class.


No comments:
Post a Comment