(Watercolor Plus project follows)
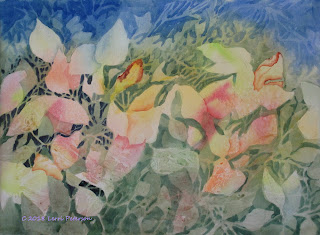
When you are doing negative painting you can do as much or as little as you need. This is about 4 or 5 layers of wash, each time finding more leaves and twigs to leave unpainted. From here I wanted to get started on fleshing out the leaves so I went dark (next image) and did my last wash before working on the leaves, once again leaving some of the last wash as twigs or leaves deep in the bush.
To make the dark color, I used Hooker's green, ultramarine blue and a tiny touch of purple and painted in where I wanted the darkest darks.
What my painting looked like as I started adding the dark color.
Notice how by adding these dark colors into the painting the leaves now look quite light and stand out from the paper. Using contrast is not only fun but it adds a bit of drama to your painting. don't be afraid of the dark :-)
Next I got started on fleshing out the leaves I have left unpainted until now. I have the reference photo close at hand for reference to see not only the color changes in the leaves but also the shapes they make as they shrivel and die.
The browned edges are not just one color. I use orange, let it dry a bit then burnt sienna, and sometimes I will also add burnt umber if I want it really dark. I also and touches of yellow or red, as well as blue for shadows to separate one leaf from the other. I also used the same dark color for the deep shadows to make holes in the leaves.
Have fun with this part and no, you don't need to do all the leaves you have left unpainted, only do as many as you feel necessary. This whole exercise I good painting is good practice not only for negative painting but also honing your powers of observation. Remember to keep the washes light doing the negative painting, the detail can be a bit stronger but still needs to be transparent.
I still have quite a bit of work to do on the leaves,this is where I left off in class.
Watercolor Plus: Missing Her Partner Week 3
I wanted to do some of the work on this I would normally put off until I was a bit more finished with the cactus and boots but I do know how when you are learning you want the painting to look like something and you get impatient and that is when you make problems for yourself so the last class we added shadows and background to make the painting look a bit more finished.
These shadow and ALL shadows need to have blue and/or purple in them to make them look like shadows. Right now I don't need to worry about the ground color because that will be next and we will paint right over what we have and the shadow will look like it is on the dirt.
The most important part about shadows is you need to be aware of their shape. Shadows occur when an object blocks the light source, in this case the light is coming in from the right so the shadows are on the left. Look at the shape of the shoe shadow in particularly (use the reference photo as you best source of information). The closer the boot is to the ground the closer the shadow is to the boot. This sets the boot down on the ground near the heel. This boot is slightly leaning on the cactus and toes of shoes turn up a little so the front of the boot has more of a shadow. Really look at this before you paint it.
Next I added the background and the foreground dirt. The lighter colors are yellow with burnt sienna and orange, use water to lighten and I PAINTED RIGHT OVER THE SHADOWS of the cactus and the boot. Notice how the color changed when I put another color over the blue and purple.
The dark area behind the cactus add ultramarine blue and touches of purple to the sienna or umber to create a cool brown color for the shadows. I will have to go over this again if you missed it.
I also went over the entire cactus with a mix of sap green and yellow just to intensify the color of the cactus. I painted over everything not just the light areas. I also did more work on the shadows of the cactus ribs and added more color to the boot.
When I was doing the dark background color, I used that color to make the shapes of the flower petals using negative painting.
I added more color to the boot but I was very careful not to lose the light areas of my boot. Many of you want to move the paint all the way across the boot when in reality you only want to soften the edges of the color you put down. this requires a lot of rinsing and drying of your brush as you paint.
We have 1 more class and I think we will get it done enough to call it good. You have learned a lot with this painting and remember: The more you paint the better you will become because you will be learning more and more about how your paint, brushes and paper all work together. Keep painting and I will see you in class.


No comments:
Post a Comment