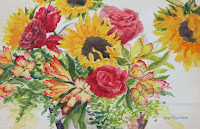
Watercolor Project: TJ'sBouquet Week 2

 PV students your class the previous week so
please refer to it before moving on to this one we will get there probably next
week do the best you can to get caught up to where we left off in class and we
will proceed from there you should have your flowers in your basket under
painted.
To continue with the
watercolor project and the Torrance class, I started working on the basket and
then I after that I started putting in the detail for the flowers and leaves.
You should all have your
reference photos in front of you when you are painting your project, it has all
the information you need to paint this painting, I'm constantly looking back at
my photo as I am painting and you should get into this same habit. There is an
area of
dark rust at the bottom of the basket and where the paint has chipped
off, that color was a deep dark brown a mix of burnt sienna, ultramarine blue
and a touch of purple, you want to keep your color to the warm side or the
brown side, and if you have to you need to draw a line - more specifically an
irregular shape - to indicate where the paint stops and the rusted metal begins
before you start to paint, do it before you start to paint. Remember that you
have ferns that come down in front of the pot and you will need to paint in
between the branches of the fern (negative painting).
Next I started working
on the sunflowers by intensifying the color and adding the shading for the
sunflowers. Yellow is a bit tricky because the shadows aren't necessarily or
traditional blues and purples, they are more in the reds and oranges so those
are the colors I was using in the sunflower shadows. I used my cad yellow with
a little touch of orange to go over some of the deeper colored pedals to
intensify the color as well as adding in the shadows
and contours. You don't
need to paint everything you just need to suggest pedals and the depth between
pedals and curves. All I did was just suggest some shapes with my colors, but I
was constantly going back to my reference photo and looking to see where I
needed to put the reds and oranges and their general shapes. The reds will be
your deepest colors in the sunflowers you will also shape your flowers a bit
with these colors more shaping will come later as we work into darker colors.
For the roses you are
going to need to add dark reds for the flower detail and shadows, the color
that you painted before will be your highlight color. You will be using
alizarin crimson for the medium dark and alizarin crimson with a touch of blue
in it for you darkest colors. Be sure that you are looking at your photograph
before you start painting so that you can see where and what you are painting.
Remember, the roses look in all directions. as do the sunflowers. and this is
what you want to try and create in your painting you want to get the darkest
colors in interesting shapes in your roses to suggest the inside pedals, they
are all folded up from the inside and the petals open from the outside, so look
at the photograph and see where your darkest colors are and paint your shapes
accordingly, that's the best advice I can give you, remember to save your light
under painting for your highlights.
I also worked on the
leaves. These leaves need to have some medium and dark greens put into them. The
medium colors I used SAP green with a touch of orange to dull it and maybe the
occasional touch of blue for a deeper color. For the darker green I used
Hooker's green with ultramarine blue to darken it, again look at your
photograph and see where the dark colors are, these dark colors are how you're
going to shape your flowers look at them between the smaller yellow and red
flowers and put the darks in to shape your flowers in the sunflowers you'll see
in several of them there are some darker green that go in between and behind
the petals use the darker color to shape the outside edges of the petals this
is what we do in watercolor you can also use the medium color much the same way
but don't lose all of your lightest lights we will get to those probably next
week.
On the little yellow and
red flowers I was using my little angle brush to create the red fringed edges
of these flowers. First I rinsed my brush well then when I loaded my brush I only
loaded the tip of my brush. I then placed the whole end of the brush on my
paper with the loaded tip at the end of the flowers where the reds are and
pulled down and around to create that lacey blended look. This takes practice
but it is worth it.
This is where I stopped
for the day so try to get your paintings as far along to this point as you can,
we are going to start working on the background next week - yes we are that far
along - so keep painting and I will see you in class.


No comments:
Post a Comment